
Enjoying Git without TortoiseHg workbench
Using Git as an experienced hg / Mercurial user can be frustrating. I can say that from personal experience. There is no free GUI for Git that match the power and ease of use of TortoiseHg workbench, and some terms in Git just annoy hg users to no end, like what exactly a pull is supposed to do.
But there is hope, of course, and in this article I will explain key concepts that I found important to understand properly coming from Hg, and you will find some hints to make the Git experience more smooth.
Note that this is not written for total Git beginners. You may want to follow a Git getting started tutorial in parallel with reading this.
Let me start by making a few key points:
- *** Stop looking for a GUI that matches TortoiseHg workbench ***
I did this for years. My thinking was that since Git was so prevalent someone must have made a brilliant free GUI that will make everything obvious, so I wouldn't have to spend time and energy to learn the nitty gritty details of the Git command line.
This is a futile endeavor. There is nothing out there that will to that, and nothing will be exactly like TortoiseHg.
- *** Take the time to actually learn how Git works ***
Git is similar in many ways to Hg, but still quite different. To enjoy using Git it is really important to take this seriously and spend the mental effort required to learn how Git works.
There are some philosophical differences to be aware of also. In Git it's common to rewrite history to clean up commits, while in Mercurial land rewriting history would be frowned upon. My recommendation is to learn these techniques anyway and try them out before deciding whether to use them or not.
- *** Learn how to use the Git command line ***
Being spoiled with TortoiseHg workbench may mean never having been forced to do version control management from the command line. Version control may seem like something eminently better done with a helpful GUI.
But in Git you just have to loose this idea. Mastering Git from the command line is an essential step to start enjoying it and will make using any odd GUI more tolerable afterwards. It will also unlock a lot of powerful operations.
Enough talk, lets get started.
This guide assumes a Linux-like system with Git installed.
1. Configure Git
Git configuration options can be set locally for a repository, globally for a user or even system wide. In the following examples the settings are set globally for the user. To set a setting locally change directory to the repository root and run the commands without --global.
Git needs a username and email to use as the author of commits. Set these with:
git config --global user.name "My name"git config --global user.email my@email.com
It may be helpful to change the default text editor. Git uses this editor for editing commit messages:
git config --global core.editor nano
If planning to synchronize with remote repositories, it is very helpful to enable the credentials store. Doing this will make Git store the entered username and password when pulling or cloning a repository so the login information doesn't have to be typed in again:
git config --global credential.helper store
Note that doing this will store the login including password in plaintext in the file /home/<username>/.git-credentials
Another very convenient class of configuration values is command aliases. They can turn long commands into much shorter commands by string substitution. In this article there will be several suggested command aliases, read on.
To see all the currently visible configuration values try: git config --list
2. Understand commits, branches and HEAD
In Git, commits are basically snapshots of the working tree files identified by a SHA-1 hash with a bit of metadata like parent commit pointers. Commits are typically referenced in the command line by the first 7 characters of the SHA hash.
A branch is nothing more than a pointer to a commit with a name. It points at the tip of the branch and Git will move it along when adding commits to the branch. The individual commits keep no record off what branch they belonged to when they were made.
Read the previous paragraph again. That branches are just pointers is one of the most important realizations to make when learning Git coming from Mercurial.
The HEAD is a special pointer representing the commit being worked on currently, like the tip in Mercurial. Typically HEAD will point at a branch, which then points at a commit. This is essentially how Git knows which branch is being worked on.
If HEAD points directly at a commit the situation is called detached HEAD. It's not as dire as it sounds, a branch pointer can easily be created to rectify the situation.
But if commits are left without anything pointing at them, they are essentially regarded as trash by Git. They will not be visible in normal log print outs and Git's garbage collector may delete them at some point.
Here is a visual depiction of a couple of commits, branches and HEAD, and how they all point at each other:
                                              HEAD
                                                |
                                                v
                                           branch: master
                                                |
                                                v
commit: First  <--  commit: Next  <--  commit: Latest greatest
                              ^
                               \
                                 commit: Experimental work
                                              ^
                                              |
                                     branch: just-testing
Tags are also just pointers to commits similar to branches, but unlike branches they stay where they are until deleted.
3. HEAD vs. Staging area vs. Working directory
Understanding this trifecta is crucial when using Git. Briefly:
The HEAD points to the latest commit being worked on, as explained in the previous section.
The Staging area is a set of changes relative to HEAD intended to be committed at the next commit operation. The Staging area is some times referred to as the index.
Note that the Staging area is not just a list of filenames to be committed, it keeps the actual content of the files. For example, if a file with changes is added to the staging area, and after that is changed further in the working directory, the Staging area will not reflect the latest changes of the file. At that point it's possible to either update the staging area with the latest changes with git add, or the file can be reverted to its staging area state with a git checkout --.
The Working directory refers to the state of the actual files in the working directory.
Here is a visual depiction of some commands that operate between these three areas:
                 HEAD commit   -   Staging area   -   Working directory
                 -----------       ------------       -----------------

 add                                             <---

 commit                      <---

 commit -a                   <-----------------------

 reset HEAD                  --->

 checkout --                                     --->

 checkout HEAD               ----------------------->
4. Showing differences
The diff command can show differences between the three areas discussed above, as well as between any two commits.
Here is a visual depiction of some common diff operations:
                                 ---    git diff HEAD    ---
                               /                             \
                              v                               v

 Previous commit   -   HEAD commit   -   Staging area   -   Working directory
 ---------------       -----------       ------------       -----------------
                   ^                 ^                  ^
                   |                 |                  |
            git diff HEAD^ HEAD      |              git diff
                                     |
                             git diff --staged or
                             git diff --cached
Showing a full directory comparison with an external tool
When diff is used by itself, the differences will be shown as - and + lines in the terminal with only local context. In case of more complex differences, a graphical diff tool is a great advantage. I keep coming back to kdiff3 because of the way it shows a directory tree as well as a two pane file difference view when doing dir compares.
Git can use an external tool for showing differences with git difftool and the option --dir-diff will make Git do a full directory difference instead of going through individual files.
The following configuration values elect kdiff3 as the graphical diff and merge tool, and creates a dd command alias:
git config --global diff.guitool kdiff3git config --global merge.tool kdiff3git config --global alias.dd "difftool --dir-diff"
After doing this, git dd can be used generally instead of git diff to show a full directory by directory comparison using kdiff3.
5. Printing a neat revision log
The default revision log or commit log print out from git log is not the greatest to get an overview of what's going on. But it can be improved in lots of ways and with character coloring it can become good enough to not miss a GUI too much.
Making a few customized log print commands stored as command aliases will greatly improve the experience of using Git in the terminal.
Here are the command aliases I have settled on:
git lga
Short for "log-all". This is my go-to log print command I use all the time to see the newest commits in all branches.
Set it up with:
git config --global alias.lga "log --all --graph --abbrev-commit --date=short --pretty=format:'%C(red)%h%Creset %ad %C(bold blue)%an%Creset: %s%C(yellow)%d%Creset'"
This is git lga after cloning: https://github.com/githubtraining/hellogitworld.git as an example:
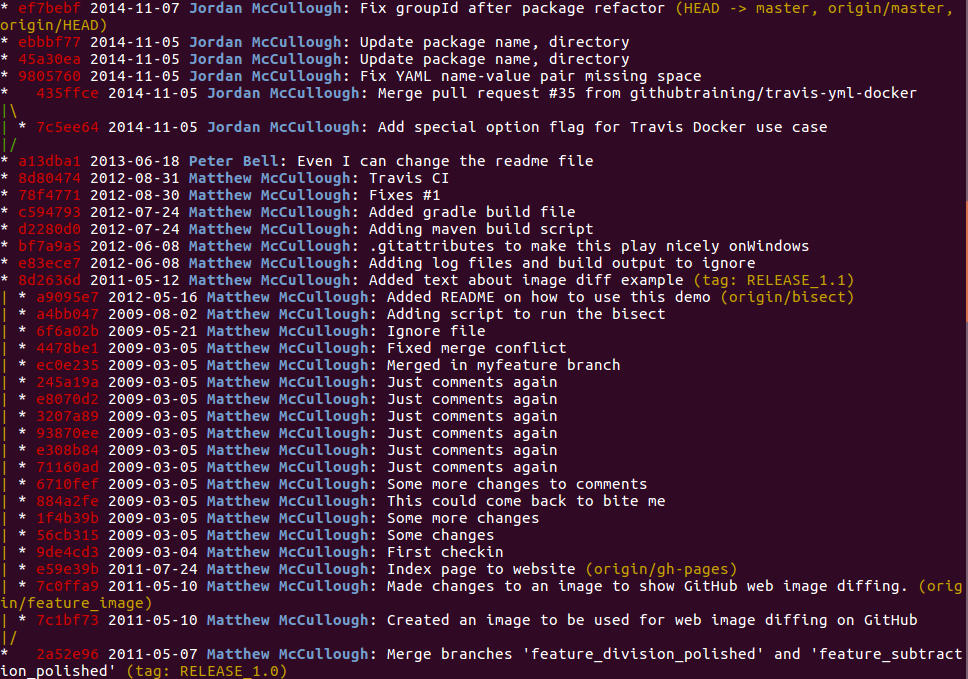
git lg
Short for just "log". This is similar to lga but shows only history related to the current branch. This is handy to focus on one's own branch in complex repositories.
Set it up with:
git config --global alias.lg "log --graph --abbrev-commit --date=short --pretty=format:'%C(red)%h%Creset %ad %C(bold blue)%an%Creset: %s%C(yellow)%d%Creset'"
git lgb
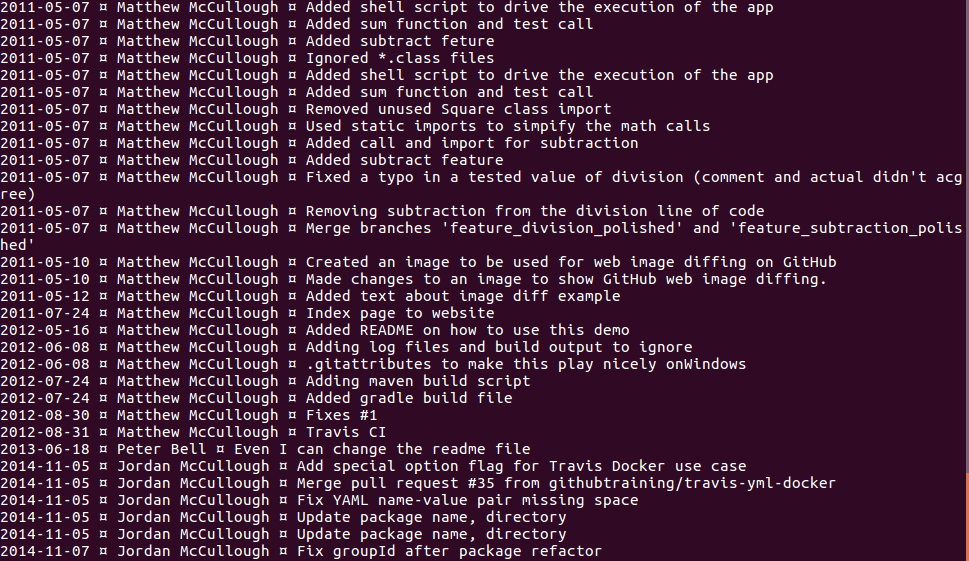
Short for "log bookkeeping". This printout is optimized for printing logs to be imported in a spreadsheet and can be seen as an example of a highly customized printout for a specific purpose. In this case the purpose is to get a record of what individual contributers committed on which days. The ordering is reversed so newest logs are at the bottom. Pressing the End key after invoking git lgb is adviced to jump directly to the latest logs. The uncommon column seperating character ¤ is to avoid unintended extra columns when importing in a spreadsheed application.
Set it up with:
git config --global alias.lgb "log --reverse --all --abbrev-commit --date=short --pretty=format:'%ad ¤ %an ¤ %s'"
This is git lgb on the same repository:
Bonus tips
Moving the HEAD pointer
There are easily accessible Git commands for moving stuff like a branch pointer:
git branch -f <branch> <commit>
But to move the HEAD pointer and ONLY the head pointer without touching the state of the working directory is not so easily achieved. It may seem like something that should never be done, but in some cases it can be very useful.
It can be done with a lower level "plumbing" command:
git update-ref --no-deref HEAD <commit/branch>
I made a "movehead" alias for this:
git config --global alias.movehead "update-ref --no-deref HEAD"
Now the HEAD can be repositioned with:
git movehead <commit/branch>
When playing around with movehead notice how the Staging area seems to really be a full copy of the HEAD commit plus the staged changes. Moving the head with this command does NOT change this full copy of the previous commit present in the Staging area, and thus it appears as if the previous commit state has been fully staged and ready to commit on to where the head is now pointing.
"gitout" script for extracting the full working tree of a previous commit
Sometimes it's useful to extract a full copy of the repository at some previous commit for further inspection without messing with the state of the current working directory. This can be done in Git with the worktree command, but since it's more involved than just a single command, I ended up writing a bash script.
The script is named gitout. It stores the extracted working tree in the folder /tmp/gitout/:
#!/bin/bash

DESTFOLDER=/tmp/gitout

if [ "$#" -ne 1 ]; then
  echo "Usage:"
  echo ""
  echo "  gitout <branch/tag/hash/reference>"
  echo ""
  echo "This will copy the entire state of the repository at the given reference to:"
  echo $DESTFOLDER
  echo ""
  exit 1
fi

set -e
rm -rf "$DESTFOLDER"
mkdir -p "$DESTFOLDER"
git worktree add -f "$DESTFOLDER" $1
rm "$DESTFOLDER/.git"
git worktree prune

echo ""
echo "The state of '$1' is now available in:"
echo ""
echo $DESTFOLDER
echo ""
I hope you enjoyed this content!

Comments powered by Talkyard